


The Twisted Cable Headband is beautiful, cozy and so soft in Furls Wander Acrylic Yarn. I love how quickly this headband works up and how fun the simple twisted cable is.


The Twisted Cable Headband matches the Twisted Twin Cable Scarf and if you loved it, then you will definitely love the matching headband! Plus, it makes a wonderful gift! Shhhhh! Don't tell but a few of my family members may be getting this headband this year! Wink wink.

I designed both the scarf and headband in worsted weight yarn and it was the perfect match to this cable and stitch pattern. The stitches are perfectly defined and the cable looks amazing, plus it's super warm and cozy!


Twisted Cable Headband
Purchase the pdf or favorite on Ravelry, thank you! <3
US Terminology
Difficulty
Intermediate
Size
Adult (fits circumference 20"-23")
Gauge
8 sts and 7 rows = 2" in the cable stitch pattern
Materials
- Furls Wander Acrylic (1 skein) in color way Mist (65 grams used)
- 100 grams/120 yards 100% acrylic Medium 4 Worsted Weight Yarn
- Size J (6.00 mm) Furls Cruella Deville 12” tunisian crochet hook or regular crochet hook with no handle
- Size G (4.0 mm) Furls Odyssey crochet hook
- Scissors
- Measuring tape
- Darning needle
- Optional: stitch marker
Abbreviations
tks: tunisian knit stitch
tps: tunisian purl stitch
m1tb: tunisian increase in the top bar
sk: skip
st(s): stitch(es)
Video Tutorials
Notes
- This pattern can be worked with a regular crochet hook that has no handle.
- This pattern is worked flat with the right side of the work facing.
- Do not turn your work at the beginning of each row. Each row is worked from right to left (forward pass) and then from left to right (return pass).
- At the beginning of each row, the first stitch is on the hook and counts as a Tunisian knit stitch.
- The width of the headband will decrease after R2.
- Mark the cable rows with a stitch marker so it's easier to know what row you are on.
- If the size G (4.00 mm) crochet hook is too small to use as the cable hook then go up a hook size until you are comfortable.
The Pattern
R1: Forward Pass: ch 17, starting in the second ch from the hook, pick up a loop in the back hump of each ch across. =17 loops
Return Pass: yo and pull through 1 loop on the hook, *yo and pull through 2 loops on the hook. Repeat from the * across until 1 loop remains on the hook.
*Should measure approximately 4.75” wide (this will shrink after the first cable row)

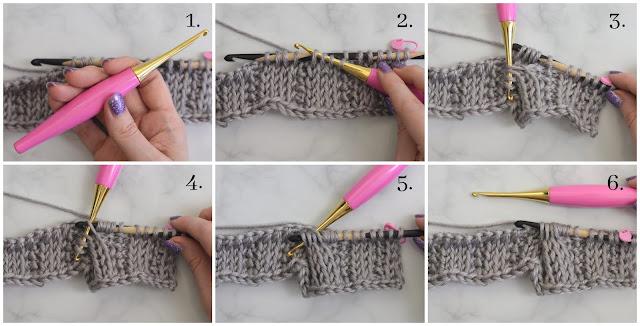
*Note that this photo tutorial is from the scarf, but the steps are still the same.
With another hook (image 1), tks into the first 4 sk sts. (image 2) Slide these sts onto the first hook by twisting the second hook straight up and while keeping it in the front (image 3), insert the hook into the first st on the second hook (image 4), slide the first hook through the rest of the sk sts (image 5) and slide the sts onto the first hook and off of the second hook. (image 6)
*Note that this photo tutorial is from the scarf, but the steps are still the same.
tps into the next st, tks into the next 3 sts. =15 loops
Return Pass: yo and pull through 1 loop on the hook, *yo and pull through 2 loops on the hook. Repeat from the * across until 1 loop remains on the hook.
*Should measure approximately 3.5” wide.
R3: Forward Pass: tks into the next 3 sts, tps into the next st, tks into the next 4 sts, m1tb, tks into the next 4 sts, tps into the next st, tks into the next 3 sts. =17 loops
Return Pass: yo and pull through 1 loop on the hook, *yo and pull through 2 loops on the hook. Repeat from the * across until 1 loop remains on the hook.
R4: Forward Pass: tks into the next 3 sts, *tps into the next st, tks into the next 4 sts. Repeat from the * one time, tps into the next st, tks into the next 3 sts. =17 loops
Return Pass: yo and pull through 1 loop on the hook, *yo and pull through 2 loops on the hook. Repeat from the * across until 1 loop remains on the hook.
R5-R7: Repeat R4
Repeat R2-R7 until the headband measures approximately 17” long but end after a R2.
Do not cut the yarn.
Seam
Fold the headband in half and line up the stitches of the two ends. Slip stitch to connect the two ends by inserting the hook into the stitch directly across from the stitch on the hook (through both loops), yarn over and pull through both loops to create a slip stitch. *Insert the hook into the stitch next to the hook by inserting it into the stitch just like for a tunisian knit stitch, insert the hook into both of the loops at the top of the stitch directly across from it, yarn over and pull through both loops to create a slip stitch. Continue from the *across.


The End!
Copyright ©2021 Alexandra Halsey | With Alex
You may sell any finished items, but I do request that you put a link back to my pattern and credit
