


Hello! I don't know about where you all live but here in North Carolina, it's starting to get really chilly and we even have a chance of snow today! When it's this cold outside I do not go out unless I have at least a beanie, cowl or scarf, and a coat or sweater on and this year I am obsessed with cowls! Today I have another free crochet cowl pattern, the Hidden Butterfly Cowl, to share and a giveaway to go with it! Scroll down for the FREE pattern, and to find out the details about the yarn and pattern pdf giveaway!

I used gorgeous yarn by Aquarius Make to design this cowl and I love how the color worked up with this pattern and texture. The yarn is medium worsted weight yarn and this colorway is called Tulip.


The fabric created with the waistcoat stitch and Aquarius Make's yarn is so soft and squishy. It feels so good against my neck and it definitely helps keep me warm! I definitely found that out when my kiddo and I went out late one night to take the above photo!


The stripes of colors transitioned beautifully for my design and the butterflies look so neat with the color changes too! And one skein of Mandala Sparkle is all that it takes!

Now for the GIVEAWAY!
Win:
-2 skeins of Aquarius Make's yarn in Tulip or color of winner's choice (worsted weight)
-and the pattern pdf of my Hidden Butterfly Cowl
Head on over to my instagram to enter!
Giveaway will end on Dec 23, 2020 at midnight!

Hidden Butterfly Cowl
favorite this pattern on Ravelry, thank you! (this helps a ton!)
US Terminology
ch: chain
st(s): stitch(es)
ea: each
hdc: half double crochet
wst: waistcoat stitch
- Caron Simply Soft
- Lion Brand Heartland
- Red Heart Soft
- I did test this pattern with Lion Brand Mandala Sparkle (one skein) which is a 3 weight yarn. It worked out really well and gauged the same.
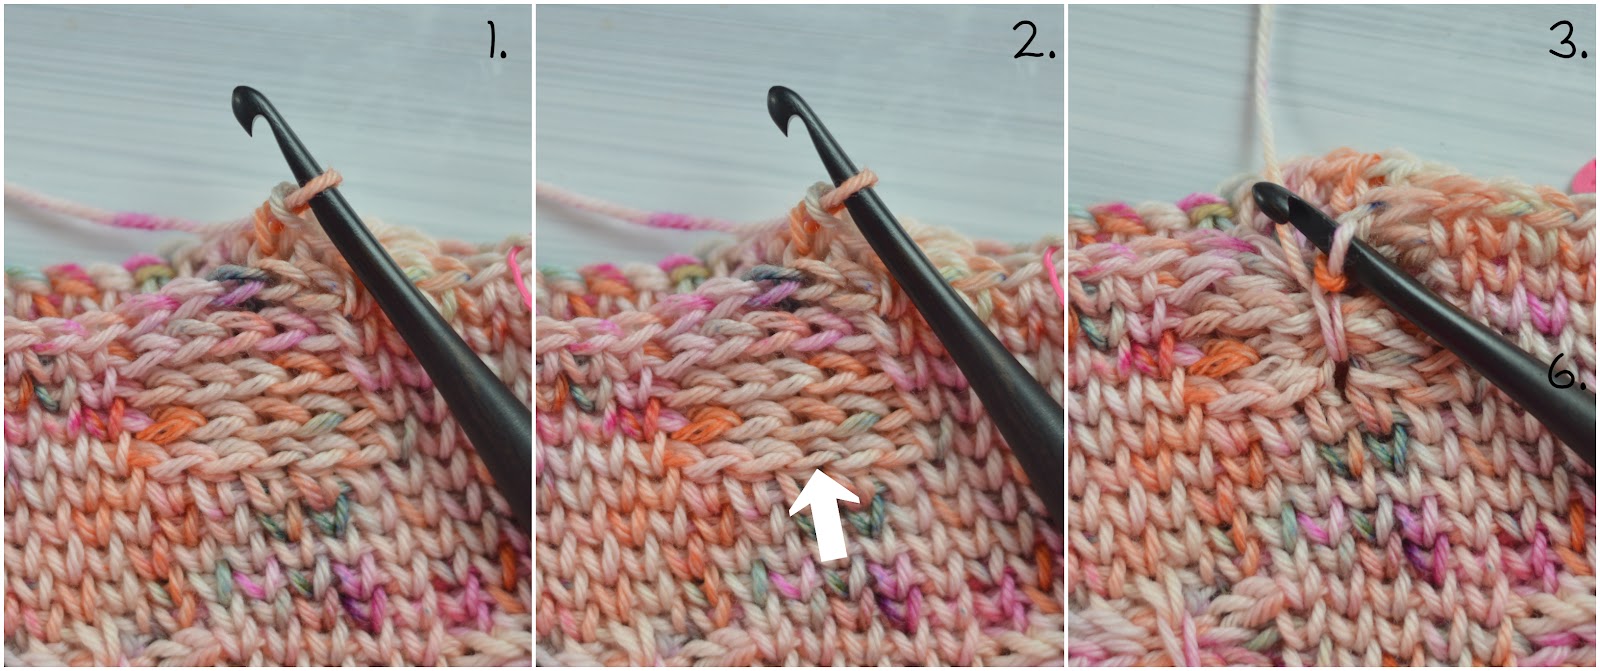
How To Start R2
Fold in half and line up the 1st st with the last st made. (image 1 and 2) Without making a join, tilt the work forward and find the 3rd back loop of the 1st st from R1 (image 3) and insert the hook into the 3rd back loop of that st (image 4), yarn over, (image 5) complete the hdc and mark this stitch with a stitch marker. (image 6)

The Spike Stitch
Insert your hook into the marked stitch (image 2), yarn over, pull up a loop and finish, yarn over and pull through both loops on the hook to finish the spike stitch. (image 3)
Insert the hook into the top of the spike stitch (image 2) yarn over and pull up a loop, yarn over and pull through both loops to complete the single crochet. (image3)

Video Tutorials
R1: ch 81, working into the back hump of ea ch: put a hdc into the 2nd ch from the hook and in ea ch across. =80
Should measure approximately 22.5” long
R2: Fold in half and line up the 1st st with the last st made. Without making a join, put a hdc into the 3rd back loop of the 1st st from R1. Mark this st with a st marker. (See notes for help.) Hdc into the 3rd back loop in ea st around. =80
The gap left at the bottom will be fixed later with an invisible join.
Continue working in a spiral and mark the beginning of ea round:
R3: hdc into the 3rd back loop in ea st around. =80
R4: sc (keep ea sc loose because you will be working a wst into it) into the 3rd back loop in ea st around. =80
R5-R7: wst in ea st around. =80
R8: *wst into the next 5 sts, hdc (insert the hook into the next st as if you were making a wst) into the next 5 sts. Repeat from the * around. =80
R9: *wst into the next 5 sts, hdc into the 3rd back loop into the next 5 sts. Repeat from the * around. =80
R10-R12: Repeat R9
R13: *wst into the next 5 sts, sc (keep ea sc loose because you will be working a wst into it) into the 3rd back loop in the next 2 sts, spike st (counts as a st here and throughout the pattern), sc into the 3rd back loop into the next 2 sts. Repeat from the * around. =80
R14: wst into the next 7 sts, sc into the spike st, *wst into the next 9 sts, sc into the spike st. Repeat from the * around until 2 sts remain, wst into the last 2 sts. =80
R15-R16: wst into ea st around. =80
R17: wst into ea st around until 1 st remains. hdc (insert the hook into the next st as if you were making a wst) into the last st. =80
R18: hdc (insert the hook into the next st as if you were making a wst) into the next 4 sts, wst into the next 5 sts, *hdc (insert the hook into the next st as if you were making a wst) into the next 5 sts, wst into the next 5. Repeat from the * around until 1 st remains. hdc into the 3rd back loop into the last st. =80
R19: hdc into the 3rd back loop into the next 4 sts, wst into the next 5 sts, *hdc into the 3rd back loop into the next 5 sts, wst into the next 5 sts. Repeat from the * around until 1 st remains. hdc into the 3rd back loop into the last st. =80
R20-R21: Repeat R19
R22: hdc into the 3rd back loop into the next 4 sts, wst into the next 5 sts, *hdc into the 3rd back loop into the next 5 sts, wst into the next 5 sts. Repeat from the * around until 1 st remains. sc (remember to keep it loose) into the 3rd back loop into the last st. =80
R23: sc into the 3rd back loop into the next st, spike st, sc into the 3rd back loop of the next 2 sts, wst into the next 5 sts, *sc into the 3rd back loop into the next 2 sts, spike st, sc into the 3rd back loop into the next 2 sts, wst into the next 5 sts. Repeat from the * around until 1 st remains. wst into the last st. =80
R24: wst into the next st, *sc into the spike st, wst into the next 9 sts. Repeat from the * until 8 sts remain. wst into the next 8 sts. =80
R25-R27: wst in ea st around. =80
R28: wst into the next 4 sts, hdc (insert the hook into the next st as if you were making a wst) into the next 5 sts, *wst into the next 5 sts, hdc (insert the hook into the next st as if you were making a wst) into the next 5 sts. Repeat from the * around until 1 st remains, wst into the last st. =80
R29: wst into the next 4 sts, hdc into the 3rd back loop into the next 5 sts, *wst into the next 5 sts, hdc into the 3rd back loop into the next 5 sts. Repeat from the * around until 1 st remains, wst into the last st. =80
R30-R32: Repeat R29
R33: wst into the next 4 sts, sc (keep ea sc loose because you will be working a wst into it) into the 3rd back loop into the next 2 sts, spike st (counts as a st here and throughout the pattern), sc into the 3rd back loop into the next 2 sts, *wst into the next 5 sts, sc into the 3rd back loop into the next 2 sts, spike st, sc into the 3rd back loop into the next 2 sts. Repeat from the * around until 1 st remains, wst into the last st. =80
R34: wst into the next 6 sts, sc into the spike st, *wst into the next 9 sts, sc into the spike st. Repeat from the * around until 3 sts remain, wst into the last 3 sts. =80
R35-R37: wst into ea st around. =80
R38: hdc (insert the hook into the next st as if you were making a wst) into ea st around. =80
R39-R40: hdc into the 3rd back loop into ea st around. =80
R41: sc into the 3rd back loop into ea st around. =80
Should measure approximately 10.5 inches tall
Cut the yarn, pull through the last stitch and make an invisible join.
Fix the gap at the bottom of the cowl by making an invisible join with the tail end of the yarn.
Weave in all ends!
The End!
Copyright ©2020 Alexandra Halsey
You may sell any finished items, but I do request that you put a link back to my pattern and credit Alexandra Halsey | With Alex for the original design under the Creative Commons Attribution Share Alike license. Do not copy, share, download or publicly display this pattern or parts of this pattern without permission.

And if you make your own Hidden Butterfly Cowl, use #crochetingwithalex on social media so I can see!
Until next time,
bye!
And happy crocheting!
<3Alex
